A full player guide to part one of Shining Force 2, covering the return to Grans Island.
Easy ‘at-a-glance’ reference Simply look down the side of the page to find the place name you’re looking for.
Spoiler-proofing If you don’t want to spoil the whole game, press the button below. The walkthrough background will turn black, hiding all but the colour-coded words and enemy icons. You can highlight text with your mouse (or finger, on a touch screen) to view it.
Colour code: If you’re looking something in particular, then the code will make it easier to spot! locationcharacteritem
Icon key: Bosses marked with this symbol destroy all other monsters when killed, the battle ends when they die. Click to download some GeneCyst save games (see “How to use Save Games” on the FAQ Page) Click for more information about that location, including maps, items, book names etc.
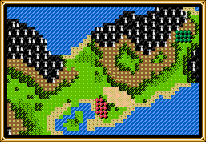
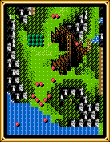
Crash Site
The ship will crash land after being fired at by the Prism Flowers, and on leaving the crash, you’ll realise it’s beyond repair. Head south-west from here towards a small Dojo.
Dojo
Here you can find a Brave Apple in a vase and then save game etc, but don’t leave right after that: if you walk along the left of the building, you’ll find a group of trees. One of these (on it’s own) has the second Vigor Ball. Continue going upwards to a waterfall, where you’ll meet Sheela doing a bit of skinny-dipping. She’ll recognise Sir Astral and join. Then head up the right side to find a piece of Mithril. Now head towards the town of Roft. In the next battle you can win a Heat Axe.
Battle 35
To Roft
Boss: Bow Rider
Monster
#
HP
MP
AT
DF
AG
MV
Chaos Wizard
1
53
49
86
48
59
5
Griffin
2
60
0
96
45
48
7
Mist Demon
2
68
28
?? (110)
41
51
6
Bow Rider
1
61
0
95
55
44
7
Dragonewt
3
60
0
87
42
46
6
Mud Man (appear in battle)
5
55
0
95
51
41
4
Shaman
1
56
46
82
42
40
5
Purple Worm
3
58
0
97
46
40
5
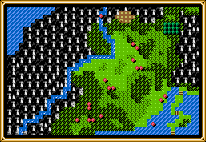
Roft
You can find a Healing Drop in a chest below the Weapons Store and a Blizzard in a chest to the left. Here you’ll be told more about the Dwarven Blacksmith and where he lives. You’ll also meet Petro (his Grandfather was the one who showed you where the old magic tunnel to Grans was), who dies soon after you arrive. This is not all that bad really, as after his death, Zynk decides to join. When you’ve finished here, follow the little path along the coast which is south of Roft. You’ll cross a few bridges to reach the entrance to a cave.
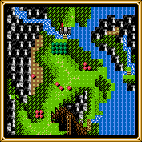
Claude’s Cave
Claude the Good Golem is here, and you’ll need to use the Arm of Golem to make him join. If you don’t have it he’ll just complain, however, despite the fact that the Nazca Ship can no longer be used, there is still a way to return to the mainland to get his arm (and any mithril you happen to have missed – you’ll be going to get it made into weapons soon). All you need do is go to the bottom of Claude’s Cave, on the left you’ll find a few squares that have a sort of brown engraved panel on them, one of these will open up the way to the Magic Tunnel. From here you can go back to Parmecia, and use the tunnel to go back to Grans (so if you forgot to go back for the other 3 characters at Creed’s Mansion you can do it now).
Prism Flowers
Once you have gotten Claude, head back out from the coastal pathway, and then to the Prism Flowers battle. Try not to get in a horizontal or vertical line from them, as they have lasers. You might notice another chest in this battle, but it too can only be reached in the Japanese version of the game – it contains a Valkyrie. This is a good fight to replay to gain more experience.
Battle 36
Prism Flowers
Boss: Executioner
Monster
#
HP
MP
AT
DF
AG
MV
Chaos Wizard
1
53
49
86
48
59
5
Griffin
1
60
0
96
45
48
7
Mist Demon
2
68
28
?? (110)
41
51
6
Bow Rider
4
61
0
95
55
44
7
Dragonewt
1
60
0
87
42
46
6
Executioner
1
64
0
92
46
45
6
Shaman
1
56
46
82
42
40
5
Purple Worm
1
58
0
97
46
40
5
Prism Flower
8
62
0
20
55
44
0
Prism Flowers
Once you have beaten them you’ll have to go on to fight Lemon, the Red Baron and leader of the Galam Army. He’s very tough and remember to let Sheela get a few hits in, after all, she needs to avenge her fiance’s death.
Battle 37
Red Baron
Boss: Red Baron
Monster
#
HP
MP
AT
DF
AG
MV
Chaos Wizard
2
53
49
86
48
59
5
Hellhound
4
62
0
?? (105)
49
50
6
Mist Demon
2
68
28
?? (110)
41
51
6
Bow Rider
4
61
0
95
55
44
7
Minotaur
2
58
0
98
51
44
5
Executioner
1
64
0
92
46
45
6
Evil Bishop
2
64
51
95
48
46
5
Red Baron
1
?? (150)
0
?? (102)
54
62
6
Dwarven Town
After you have defeated Lemon, head to the part in the river that looks a little dented in both sides. This is where you use the Dry Stone to reach the Dwarven Town in Grans Forest. Here you can find a Healing Water (chest on the right, outside); the Demon Rod (in a vase) and also the White Ring (chest on the left, outside). This is the place where you get the BlackSmith to make you some weapons with the mithril you have collected on your travels. Have a look at the Mithril Weapons Page to find out more about this. When you’re done here, head south towards Galam.
Galam
In Galam you’ll hear about the Devil’s Head Statue and also find out some more about Lemon. Not a lot else to do here except finding a Healing Water in the treasury and the Evil Shot amongst the bushes outside the Northern Gate. Head towards Yeel, on the way you’ll have a battle (in which you can win a Buster Shot and a Fairy Tear).
Battle 38
To Yeel
Boss: Geshp
Monster
#
HP
MP
AT
DF
AG
MV
Chaos Wizard
1
53
49
86
48
59
5
Hellhound
1
62
0
?? (105)
49
50
6
Mist Demon
1
68
28
?? (110)
41
51
6
Cyclops
1
64
0
?? (110)
51
46
5
Minotaur
1
58
0
98
51
44
5
White Dragon
2
66
0
?? (106)
50
53
6
Evil Bishop
1
64
51
95
48
46
5
Dark Gunner
2
60
0
97
56
45
4
Burst Rock (appear in battle)
9
45
0
0
60
43
4
Geshp
1
?? (180)
?? (120)
?? (116)
51
63
6
Yeel
The town appears deserted, but don’t be fooled by that. Go into the bar and play on the piano. This will cause a stairway to open up in the church. Even though a the priest tries to scare you away, if you persist he’ll have to let you in. In the tunnels under Yeel, Chaz will join the force and you’ll learn more of the plot. You can find a Quick Chicken and the Evil Knuckles here. When you go to leave you can either speak to Lemon and make him join or just ignore him. Either way he’ll end up in the force eventually. Now leave the town and head south. You’ll have to kill the Hydra to win the next battle, in which you can also win the Evil Ring and a Holy Thunder.
Battle 39
To the South Shrine
Boss: Hydra
Monster
#
HP
MP
AT
DF
AG
MV
Chaos Wizard
1
53
49
86
48
59
5
Hellhound
1
62
0
?? (105)
49
50
6
Hydra
1
70
0
?? (120)
62
50
4
Cyclops
2
64
0
?? (110)
51
46
5
Minotaur
2
58
0
98
51
44
5
White Dragon
3
66
0
?? (106)
50
53
6
Evil Bishop
1
64
51
95
48
46
5
Dark Gunner
3
60
0
97
56
45
4
South Shrine
After a that you’ll reach the South Shrine. If you didn’t collect the mithril here at the start of the game, you can now (but you’ll have to go back to the Blacksmith again). Inside the Shrine you’ll find a Power Water and the Holy Sword. When you find the sword you’ll have to search using A to pull it loose, and it will then be named the Force Sword. It will tell you that ‘something opened somewhere’, which means that the chest on the floor above can be reached now. It contains an Evil Axe. Now you should be ready to head into the last few battles of the game.
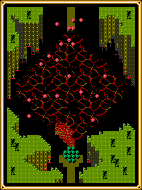
Devil’s Head
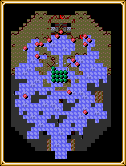
When you arrive at the Devil’s Head statue, there appears to be no way inside, and it should be like this in order for you to reach the Evil Lance behind it (you need to work your way through the ‘trees’). Once you have this, you can then use the Force Sword at the mouth of the Statue (as the Story Tellers in Tristan told you to) to open it. If you passed Lemon by in Yeel, he’ll join you now. Inside the head you have a maze to get through – see the new map if you get stuck! After the maze, you’ll meet up with an old friend: Oddler, but now you must fight him, as he is the Greater Devil Lord OddEye! He’s very tough to kill and you need to be careful during the fight as the central and north-eastern sections of the battlefield crumble away, taking occupants of the spaces with them. You can win a Counter Sword and a Fairy Tear in this battle.
Battle 40
Odd Eye
Boss: Odd Eye
Monster
#
HP
MP
AT
DF
AG
MV
Chaos Wizard
2
53
49
86
48
59
5
Chaos Warrior
3
76
23
?? (115)
50
54
5
Hydra
2
70
0
?? (120)
62
50
4
Cyclops
3
64
0
?? (110)
51
46
5
Demon
2
75
38
?? (112)
50
55
6
Demon Master
1
73
68
99
50
65
6
White Dragon
2
66
0
?? (106)
50
53
6
Evil Bishop
2
64
51
95
48
46
5
Dark Gunner
2
60
0
97
56
45
4
Odd Eye
1
?? (200)
?? (160)
?? (119)
54
67
6
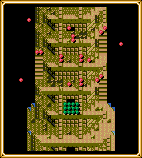
Inside the Devil’s Head
When you defeat OddEye (possibly the saddest part of the game), you’ll have to try and fight your way into the Tower of the Ancients. The battle is long and tough, as you work your way to the top of the tower. You can win a Holy Staff in this battle.
Battle 41
Tower of the Ancients
Boss: Reaper
Monster
#
HP
MP
AT
DF
AG
MV
Chaos Warrior
4
76
23
?? (115)
50
54
5
Chaos Dragon
2
83
0
?? (116)
48
57
6
Hydra
5
70
0
?? (120)
62
50
4
Demon
4
75
38
?? (112)
50
55
6
Demon Master
3
73
68
99
50
65
6
Blue Shaman
1
72
60
?? (109)
54
51
5
Reaper
1
82
31
?? (110)
49
57
6
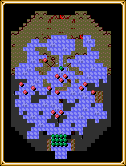
Ancient Tower
Good news awaits you when you get to the top, as Creed is alive and waiting to be a priest for you! Save your game and go ahead…. you’ll have a tough ride from now onwards, as you face the evil King Galam and his minions…
Battle 42
King Galam
Boss: Galam
Monster
#
HP
MP
AT
DF
AG
MV
Chaos Warrior
2
76
23
?? (115)
50
54
5
Chaos Dragon
1
83
0
?? (116)
48
57
6
Demon Master
2
73
68
99
50
65
6
Blue Shaman
1
72
60
?? (109)
54
51
5
Reaper
3
82
31
?? (110)
49
57
6
Devil Griffin
1
89
0
?? (120)
47
59
7
Evil Beast
2
84
0
?? (122)
51
60
6
Horseman
2
67
0
?? (110)
57
55
7
King Galam
1
?? (240)
?? (180)
?? (111)
50
62
6
Ancient Tower
…directly followed by Zeon and yet more monsters! When you fight Zeon (he has about 500HP and 180MP and uses a LV2 Demon Breath, fortunately, he can’t move, but to counter this he often gets 2 attacks). Make sure you kill all the others before him, or they’ll use the Healing Rain which they carry (you can win one of these in the battle). My strategy for Zeon is to keep most of them away from him, and just send in one at a time. When they need healing, send a healer in. Keep them there until they die, then send someone else in. Only use Bowie when it’s certain that he can kill Zeon in one go. I wish you the best of luck, and may the powers of light protect you, Hero of Granseal!
Battle 43
Zeon – The Final Battle
Boss: Zeon
Monster
#
HP
MP
AT
DF
AG
MV
Demon Master
3
73
68
99
50
65
6
Blue Shaman
1
72
60
?? (109)
54
51
5
Devil Griffin
1
89
0
?? (120)
47
59
7
Horseman
1
67
0
?? (110)
57
55
7
Arch Demon
2
99
65
?? (123)
46
61
6
Pyrohydra
5
80
0
?? (126)
53
55
4
Zeon Guard
2
?? (130)
?? (150)
?? (136)
54
64
5
Zeon
1
?? (500)
?? (180)
?? (127)
50
72
0
Granseal
The end sequence (click here to view it) is lovely, especially since you can wander around the town a bit and talk to the people before you go back to the castle. I won’t spoil it by telling you everything that happens, but I’ll leave you with this picture…
Experience is based on your strength relative to the monster you are fighting. These are the levels at which you will gain only 1 EXP for defeating each monster.
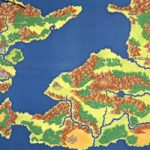
A map of the Shining Force 2 world (Grans Island and Parmecia) with pages about each town, including buildings, town maps, characters, items, key events and even the books and signs you'll find there!


